
Entering and Editing Data
Entering Items
Once you have created a Data Store and Data Classes in your laboratory system, you can begin to enter data items into the database.
Two interfaces are provided for entering items into the database. One interface allows you to enter a single item at a time. The second interface requests the number of items you want to enter and then generates a form for entering the specified number of items. Each of these methods for entering data are described below:
Entering a Single Item
1. In order to enter an item in the database, you must be logged in as a User with permissions to Edit Items.
2. Navigate to the Data Store Home Page for the Data Store in which you want to enter a new item.
3. Under the Data Classes section, find the Data Class for which you
want to enter an item. Select the add single item icon ![]() .
If this icon is grayed out, then you do not have permissions to add an
item into the database. Contact your laboratory system administrator
if you think this is an error.
.
If this icon is grayed out, then you do not have permissions to add an
item into the database. Contact your laboratory system administrator
if you think this is an error.

4. Enter the attribute values for the new item. Select the read and edit permissions for this item.
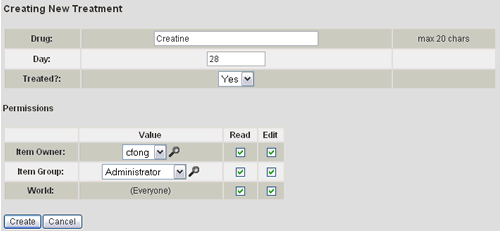
5. Select the Create button.
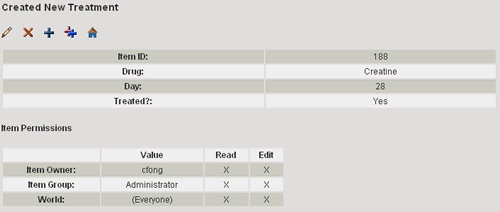
6. If there is an error, an error message will be displayed at the bottom of the screen and you will be able to modify your attribute values and resubmit. Once the item is successfully added into the database, you will be directed to an item profile page displaying each attribute value for the new item.
Entering Multiple Items
1. In order to enter items in the database, you must be logged in as a User with permissions to Edit Items.
2. Navigate to the Data Store Home Page for the Data Store in which you want to enter new items.
3. Under the Data Classes section, find the Data Class for which you
want to enter items. Select the add multiple item icon ![]() .
If this icon is grayed out, then you do not have permissions to add items
into the database. Contact your administrator if you think this is an
error.
.
If this icon is grayed out, then you do not have permissions to add items
into the database. Contact your administrator if you think this is an
error.
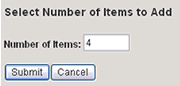
4. At the prompt, enter the number of items you want to add at this time and press Submit.
5. You will be directed to an interface for entering attribute values for the number of items you specified. Each row represents a single item to be added to the database. Ignore the Add column for now.
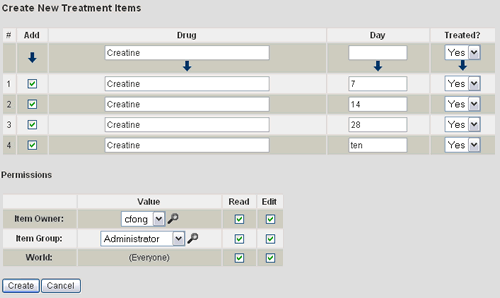
Note that the first row is a tool for propagating a given attribute
value to every row in the form (this makes it efficient to enter multiple
items that differ only slightly). To use this feature, enter the value
and select the propagate icon ![]() .
.
6. Now select the checkbox in the Add column for every item you want to add to the database. If you decide not to enter as many items as you first specified, this feature allows you to select only a subset of the rows of items to add without having to re-enter the data in a new form.
7. Enter the read and edit permissions to assign to each of these items. The permissions specified will be applied to all items. In order to change them, you must modify each item individually.
8. Select the Create button.
9. All items that were successfully added will be listed in a table with all attribute values. You may select an action in the Actions column in order to view, edit, or delete a specific item.
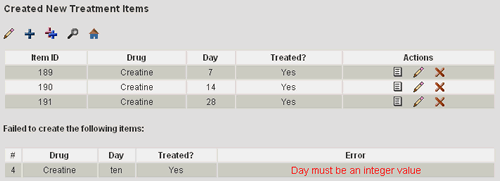
10. All items that failed to be added will be listed in a table under the Failed to Add section. The table will list the attribute values you specified and an error message describing the reason for each failed item entry.
Selecting Attributes that are Data Class References
The data type of some attributes may be a reference to another item, such as a File, User, or other Data Class defined in the Data Store. When you are adding a new item, you may be unsure what value to assign attributes such as these. The browse item tool allows you to view more details about the items available to select from when assigning the attribute value.
1. Navigate to the interface for either entering a single item or multiple items.
2. Each attribute that specifies a reference to an existing item will display an input field listing the available options. The list displays only the label for the item (note that the item attributes that make up the label can be modified), so you may want to view additional details about the listed items.

3. Select the find icon link ![]() next
to the list of items.
next
to the list of items.
4. A window will popup listing all items in the Data Class.
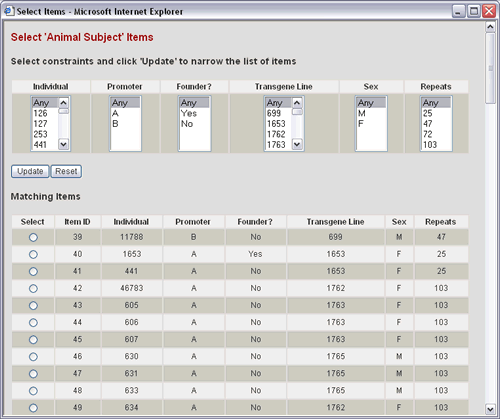
To narrow the item list down, select constraints at the top of the page and press the Update button. The list will refresh with only items that satisfy the specified constraints.
5. When you have narrowed the list enough to find the item you want, select the radio button for that item and select the Add button near the bottom of the window.
6. The window will close, and the label for the item you selected should be highlighted in the attribute input field.