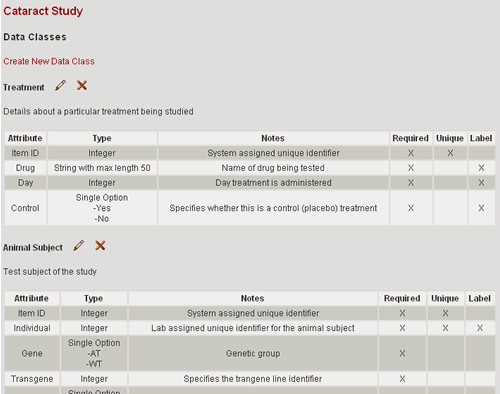
Data Classes
Creating Data Classes
After you have created a Data Store, you must create the Data Classes that define the research data you need to store.
There are two ways you can get to the online tools for defining Data Classes. First, you will be directed to the tools immediately after creating a new Data Store, and second, you can get to the tools through the Data Store configuration menu. These two methods are described below.
There are also two methods for defining the Data Classes: specifying the details for each Data Class from scratch or using a pre-existing template that defines a set of Data Classes. These two methods are also described below.
Immediately after creating a new Data Store
From the Data Store Home Page
Defining a Data Class from Scratch
Using a Template
Immediately after creating a new Data Store
1. When you create a new Data Store, you will automatically be directed to pages for creating the Data Classes that define the new Data Store.
2. You are given two options for this task: defining each Data Class from scratch or using a template that predefines a set of Data Classes
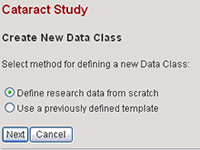
3. Select the option you want, select the Next button, and continue with instructions for the method you chose (from scratch or using a template).
Note: if you select the Cancel button, you can get back to the Create Data Classes menu through the Data Store Home Page.
From the Data Store Home Page
1. In order to create Data Classes, you must be logged in as a User with Edit Data Stores permissions.
2. From the Data Store Home Page, scroll to the Data Store Configuration section near the bottom of the screen (if you do not see this section, you probably do not have the necessary permission. Contact your administrator)
3. Select the Edit Data Classes link
4. Select the Create New Data Class link. If some Data Classes already, you are required to enter a new Data Class from scratch. Otherwise, you have the option to create it from scratch or using an existing template.
Defining a Data Class from Scratch
After choosing the option to define a Data Class from scratch, you will be directed a page with input fields for specifying Data Class values.
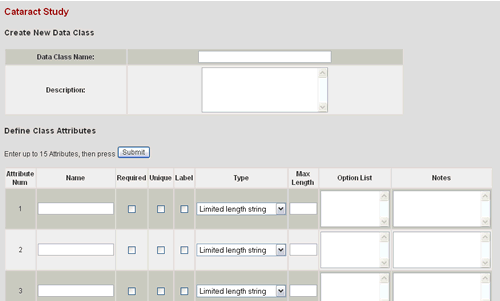
1. Enter a Data Class name and description
2. For each attribute you want to define (up to 15 - you can add more later if necessary) enter:
- Name: name of attribute (e.g. age)
- Required: check if a new item is required to have a value for this attribute (e.g. a subject item should be required to have an ID #)
- Unique: check if every item must have a unique value for this attribute (e.g. a subject ID # should probably be unique)
- Label: check if the value of this attribute should be used in the label for each item (e.g. you may want to include the name of a drug and its does in the label for a treatment item)
- Type: specifies the kind of data this attribute will hold. The options are described in detail in the Data Class attribute reference for attribute Types.
- Max Length: If Limited Length String is selected as the attribute type, enter an integer value for the max length. Otherwise, leave blank.
- Option List: If Multiple Options or Single Option is selected as the attribute type, enter a list of option values (one per line). Otherwise, leave blank.
- Notes: Enter any notes about the attribute. For example, a short description.
3. Select the Submit button at either the top or bottom of the page.
The Data Class is created and you are directed to a page where you can make Data Class modifications or add another Data Class.
Note that the edit and query widgets for each attribute are automatically assigned a default value by the system. See the Edit Data Classes section for information how to change these default values.
Using a Template
After choosing the option to define Data Classes using a template, you will be directed a page where you can browse the templates to select from.
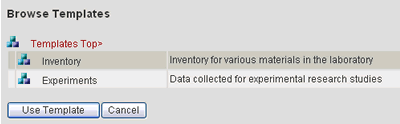
1. Browse for a template that best suits your needs.
- Templates are organized into collections which are designated by
the collection icon
 .
Click on a collection icon to view the templates in the collection.
.
Click on a collection icon to view the templates in the collection. - The template collection you are currently browsing, and each of its parent collections, is indicated at the top of the page. Select the link to any parent collection to jump back to that collection's template.
- Templates are designated by the template icon
 .
Click on a template icon to view details about
the template.
.
Click on a template icon to view details about
the template.
2. Once you have found a template you want to use, select the Use Template button.
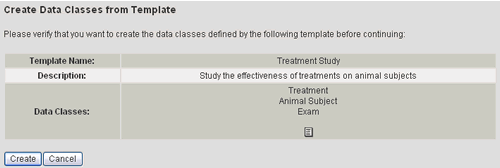
3. You will be directed to a page from which you can view the template details and verify that you want to use this template. Select the Use Template button to generate the Data Classes and Saved Queries defined by the template. Select Cancel to go back and select a different template.
4. You will be directed to the Data Class configuration page where you can edit any of the Data Classes or create a new Data Class from scratch.