|
In the case of SPM generated files, we have a mask for gray matter and a mask for white matter. The first step is to create a temporary file that represents the combined mask -- this step can be skipped if you already have a brain mask.
- We want to create a scene that contains both the white matter mask and the gray matter mask.
- Load the gray matter mask. To do this find Magnet/P117/Structural/Volume/Mask (Gray), select Gray_mask and click [Show].
- The image will come up as a blank screen because the default coloring scheme is to mask out other data. To change this go to the [Data] tab and select Gray_mask in the drop down menu. Find where the section titled Positive and change it from "Mask" to "Grayscale".
- Add the white matter mask to the scene. To do this find Magnet/P117/Structural/Volume/Mask (White), select White_mask and then drag it onto the gray matter mask.
- This will blank out the image because now the gray mask is being masked by the white mask and there is little overlap. To change this go to the [Data] tab and select White_mask in the drop down menu. Find where the section titled Positive and change it from "Mask" to "Grayscale".
- Now we need to combine both of these into a single mask file. To do this click the [Advanced] tab and select "Combine 2 Volumes" in the drop down menu. Select Gray_mask as target 1 and White_mask as target 2. The action is "Plus" to combine these volumes. Click [Go] and wait for a new nifti volume to be created and loaded. You may want to change the positive color again.
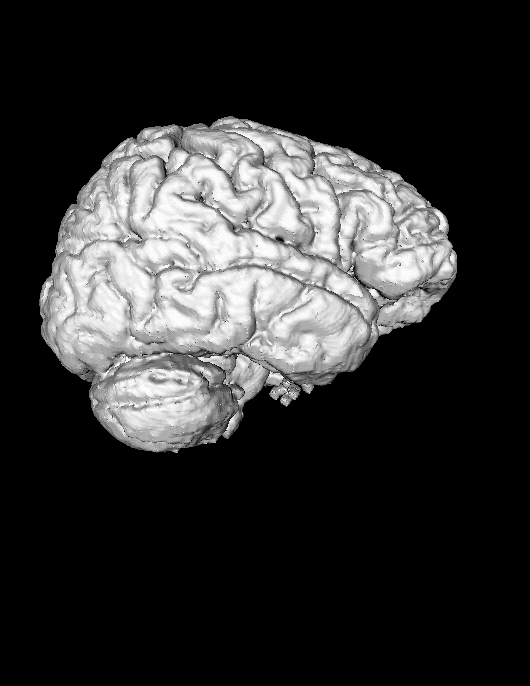
After we have a brain mask for the cortex we can either use the mask to generate an isosurface by skipping ahead, or if it lacks detail, we can use it to filter T1.
- To mask T1 we want to create a scene with both T1 and the temporary mask we created. Load T1 by finding Magnet/P117/Structural/Volume/T1, then select T1 and click [Show].
- Add the new mask by finding "New Data 1" in the tree. It should have placed itself under Mask (Gray) or Mask (White) depending on what you chose as Target 1. Then select the file and drag it onto T1
- Combine the T1 with the mask by going to the [Advanced] tab and making sure that "Combine 2 Volumes" is selected. Now specify "T1 Volume" for Target 1 and "New Data 1 Volume" for Target 2. Select "Mask" as the Action and choose an appropriate Mask threshold. 128 should work well. Click [Go].
Tip: To close tabs that you are no longer using go to the "View" pane on the bottom left and click the "X" that comes up when you hover over the image. This pane is also a good way to find data quickly.
Tip: To save your data select it in the Library tree, go to the [Data] menu and click "Save as."
Tip: If your mask has some floating debris you can use the "Morph a Volume" menu option under the [Advanced] tab to clean up the mask. Just use "Erode then Dilate" and select 2 or 3 times on the slider.
|