In the last example, we textured a square and used the square to create a cube. Let's take a different approach where we use triangles. We'll use two overlapping triangles to create a chinese checker board.
We'll focus on three concepts:
Remember that we are starting from scratch. You can (exit) the current skandha4 session and start it up again.
We start off as usual with a camera:
(setq camera (send class-camera :new
    :location '(0 0 -4)
    :target '(0 0 0)
    :up '(0 1 0)
    :diameter 5
  )
)
Then, we add a light again:
 (setq light (send class-light :new
    :target '(1 -1 1)
    :is-local nil
    :ambient-color '(0.5 0.5 0.5)
    :color '(1 1 1)
  )
)
Our simple Chinese Checker board will be made up of two overlapping equilateral triangles, one pointing up and the other pointing down. So, we have 6 points and 2 facets (polygons). Let's tell skandha4 that decision:
(defvar point-count 6)
(defvar facet-count 2)
Now, let's use a different way to create the point cloud for our triangles. We'll set up three arrays of values, one array of the X axis values, one array of the Y axis values, and a third of the Z axis values. Note that all the Z axis values are 0. This will become important when we discuss normals. We add a simple counter comment line (the one that starts with ;;) above our values to keep track of indices into the point cloud.
(setq pboard (:new class-graphic-relation point-count :initial-contents (list
;;                  0    1     2   3   4      5
                :point-x (:new class-float-array point-count :initial-contents (list
                    0 -0.866 0.866 0 0.866 -0.866
                ))
                :point-y (:new class-float-array point-count :initial-contents (list
                    1 -0.5  -0.5  -1 0.5    0.5
                ))
                :point-z (:new class-float-array point-count :initial-contents (list
                    0  0     0     0 0      0
                ))
)))
We'll use a similar approach to set up the facets, using the indices into the point cloud above. We'll also comment a count of the triangles (the line that starts with ;;). We still have three arrays, each a point in a triangle:
(setq tboard (:new class-graphic-relation facet-count :initial-contents (list
;;                  0  1
                :facet-0 (:new class-int32-array facet-count :initial-contents '(
                    0  3
                ))
                :facet-1 (:new class-int32-array facet-count :initial-contents '(
                    1  4
                ))
                :facet-2 (:new class-int32-array facet-count :initial-contents '(
                    2  5
                ))
)))
Remember from the previous lesson that the same point can be used to define more than one triangle. In fact, for large models, there are typically more than two times the number of triangles to the number of points.
Now, let's create our chinese checker board by combining the point cloud with the indices into the point cloud:
(setq ccboard (list :point-relation pboard :facet-relation tboard))
We'll create a medium brown material for the board (in an identical manner to lesson 3):
(setq material (send class-material :new
    :DRAW-AS :SOLID
    :SPECULAR-COLOR '(0.3 0.3 0.0)
    :SHININESS      0.2
    :DIFFUSE-COLOR  '(0.3 0.3 0.0)
))
And, we'll apply the material to the board (in an identical manner to lesson 3):
(setq ccboard (append ccboard (list :MATERIAL material)))
Now, we set up the thing list:
(setq thing-list
     (list :LIGHTS (list light)
     ccboard
     )
)
And draw the image to our screen:
(send camera :clear-zbuffer)
(send camera :clear-viewport)
(send camera :draw :THINGS thing-list)
(send camera :swap-buffers)
The simple Chinese Checker board looks like:

But, when drawing facets, we have to be careful that our normals are near perpendicular to our facets. Otherwise, they get shaded dark (a facet normal tells the light source how to shade the facet). If a normal is perpendicular to the facet, we get maximum lighting effect. If a normal is parallel, we get no effect. We haven't created any normals. Yet, we see the board fine. Most graphics systems have default normals for use when they are not explicitly provided by the modeler. In our system here, no shading calculation is done without normals.
Since our Chinese Checker board has been created on the Z axis, we see the same lighting effect for both facets. But, solid models (like a lung or kidney) will have facets that orient in all different directions. In that case, we need to apply normals. We can apply normals to our Chinese Checker board here:
(progn
     (:set pboard :point-normal-x
;            0 1 2 3 4 5
	(:new class-float-array point-count :initial-contents (list
	     0 0 0 0 0 0
        ))
     )
     (:set pboard :point-normal-y
        (:new class-float-array point-count :initial-contents (list
	     0 0 0 0 0 0
        ))
     )
     (:set pboard :point-normal-z
        (:new class-float-array point-count :initial-contents (list
             1 1 1 1 1 1
	))
     )
)
Now, we've explicitly set our normals perpendicular to the Z-axis (0 orientation in the X and Y axes and straight back in the Z). Notice that we get the same as the default for skandha here since both of our facets are in the XY plane anyway. Normals are defined in sets (orientation of a vector in 3-D space) of three real values that range from 0 to 1. In this case, we've decided to apply normals to each point in the point cloud. We can also apply normals to the facets instead. If we apply them to the points, skandha uses Gauraud shading across each facet. If we use facet normals, we get flat shading for that facet. Gauraud shading is usually preferred over flat because it provides more realistic shading. And, though our simple Chinese Checker board doesn't follow the general rule, we usually will have 2x the facets than points in a sophisticated model like a lung or kidney.
Go ahead and play with the normal values to see the effect of shading on our Chinese Checker board. Try
using a value of 0.5 to see if the shading is half as bright (remember that the shading is a by-product of
the lights and the normals).
Scaling Texture Coordinates
So, now we want to apply a texture to our Chinese Checker board (the coffee-with-cream color is kind of boring). We've drummed up a simple parque texture to use. Yes, parque, like the old Boston Garden flooring of the 1900s. Let's tell skandha we plan on using it:
(setq my-image (XTIF-LOAD-TIFF-FILE "parque.tiff"))


(setq my-texture (:new CLASS-TEXTURE
   :TEXTURE-IS :BY-FACET
   :GRAPHIC-RELATION my-image
   )
)
We'll use two arrays to hold the U and V values (remember those from last lesson?) for applying our texture:
(setq my-Us (send class-float-array :new point-count))
(setq my-Vs (send class-float-array :new point-count))
We'll cut out triangles from the square parque.tiff bitmap file as you see in the image here. The first point is half way across the image and all the way to the top (just follow the magenta lines). Each other texture point is calculated the same way (of course, we could have been more precise to create better equilateral triangles).
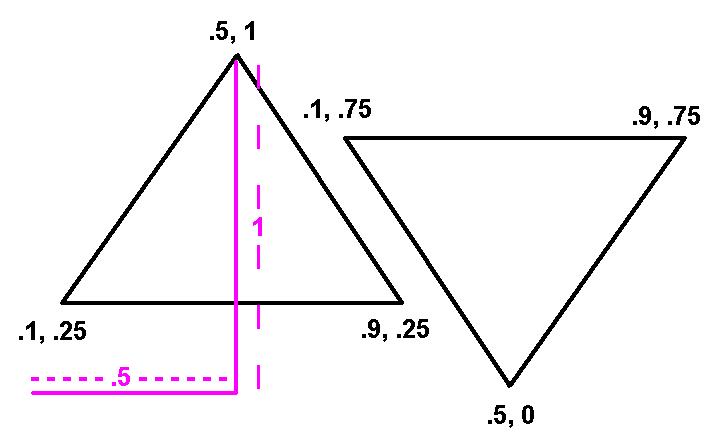
We set two values to each point in our point cloud:
;;Texture Coordinates Without Scaling
(:setf  my-Us 0.5 0)
(:setf  my-Vs 1 0)
(:setf  my-Us 0.1 1)
(:setf  my-Vs 0.25 1)
(:setf  my-Us 0.9 2)
(:setf  my-Vs 0.25 2)


(:setf  my-Us 0.5 3)
(:setf  my-Vs 0 3)
(:setf  my-Us 0.9 4)
(:setf  my-Vs 0.75 4)
(:setf  my-Us 0.1 5)
(:setf  my-Vs 0.75 5)
And, now, we can apply our U and V arrays to our point-relation, pboard, that we created at the beginning of this lesson:
(send pboard :set-array :point-texture-u my-Us)
(send pboard :set-array :point-texture-v my-Vs)
Now that our texture coordinates are defined, we can slap our texture on the Chinese Checker board:
(xg.3d-set ccboard :texture my-texture)
And reset our thing-list:
(setq thing-list
   (list :LIGHTS (list light)
     ccboard
     (list :pixel-relation my-image)
   )
)
Lights, camera, action:
(send camera :clear-zbuffer)
(send camera :clear-viewport)
(send camera :draw :THINGS thing-list)
(send camera :swap-buffers)

Hmmmmmm... That's one big parque image (or one very small Chinese Checker board). Let's take a look at scaling texture coordinates in order to tile the texture and make it look more real. Basically, we can center our image horizontally and vertically at 0, multiply our coordinates by some multiplier and cut our triangles out of the tiled image square.
Starting again from loading and setting the image:
(setq my-image (XTIF-LOAD-TIFF-FILE "parque.tiff"))


(setq my-texture (:new CLASS-TEXTURE
   :TEXTURE-IS :BY-FACET
   :GRAPHIC-RELATION my-image
   )
)
And resetting the U and V arrays:
(setq my-Us (send class-float-array :new point-count))
(setq my-Vs (send class-float-array :new point-count))
Now we set the scaled coordinates
;;Texture Coordinates With Scaling
(:setf  my-Us 0 0)
(:setf  my-Vs 22 0)
(:setf  my-Us -16 1)
(:setf  my-Vs -10 1)
(:setf  my-Us  16 2)
(:setf  my-Vs -10 2)


(:setf  my-Us   0 3)
(:setf  my-Vs -22 3)
(:setf  my-Us  16 4)
(:setf  my-Vs  10 4)
(:setf  my-Us -16 5)
(:setf  my-Vs  10 5)
We reset our U and V arrays:
(send pboard :set-array :point-texture-u my-Us)
(send pboard :set-array :point-texture-v my-Vs)
Set the thing-list again:
(setq thing-list
   (list :LIGHTS (list light)
     ccboard
     (list :pixel-relation my-image)
   )
)
And lights, camera, action:
(send camera :clear-zbuffer)
(send camera :clear-viewport)
(send camera :draw :THINGS thing-list)
(send camera :swap-buffers)
Now you know how to create triangles, define normals, and apply texture coordinates!