Creating
a Simple Scene
This tutorial example lets you follow step by step by typing the instructions into the skanda4
interpreter as you read about them. The first example starts here and continues through the
Animation section of Lesson 2. Lesson 3 starts from scratch and is self-contained. Lesson 4 also
starts from scratch and is self-contained. Start the skandha4 interpreter by typing skandha4
at the prompt. Be sure skandha4 is in your path. Usually, the prompt appears as a greater-than
(>) character. You should enter all code fragments where you see the prompt. You can hit
enter on your keyboard after you copy the code from your Web browser window and paste the code
into your skandha4 interpreter window.
To create a simple scene we would need the following three elements: i)
a camera; ii) a light and iii) a model of 3D object .
To create a camera, we will enter the following expression at the prompt:
The response, i.e. the evaluation result for this expression, may look
something like this:
The first three keywords are easy to interpret: you simply position
and "focus" your camera the same way as you would do with a real
camera. The last keyword :diameter, however, does
not have any clear real life analogy. We should keep in mind that
what we will later see on the screen will in fact be a result of calculations
performed within a certain range in our imaginary 3D space. Since
we cannot perform the calculations for an infinitely large range, we have
to impose certain limits. The range will be limited by two planes:
one in front of the target point and another one behind the target point,
with the value of :diameter specifying the distance between
them.
We can now create a light (an instance of CLASS-LIGHT) in a similar manner:
The light is remote (as opposed to local), and it points down, right and
away from you (the direction of the target vector). The color of
this light, coded with the vector of (red green blue), is white.
Ambient color was added to make visible those parts of 3D objects which
are not in direct light.
We can now create a model of a 3D object as follows:
This command created a thing called sphere.
In Skandha4, things are lists suitable for drawing via the
:draw
message
to cameras. In this case, the list contains two objects: a
POINT-RELATION
and a FACET-RELATION. A POINT-RELATION contains
arrays holding 3D coordinates of individual points. A FACET-RELATION
holds the information about how individual points are organized into facets.
When making the sphere, we also requested point normals.
This means that, for each point, we wanted to store its normal vector (normals
are used to calculate how 3D object reflects lights at this particular
point). Our POINT-RELATION will therefore contain
three more arrays holding information about the normal vectors for
each point. As you noticed, both POINT-RELATION and
FACET-RELATION
hold a list of named arrays of the same size. In Skandha4, a special
class called GRAPHIC-RELATION was implemented for this type of data.
To create a useful 3D model, we should fill arrays with data.
The coordinates of individual points should be calculated and then organized
into facets. For now, we will simply use one of the built-in INSERT
functions, which provide facilities for inserting visible geometry into
an existing
thing.
Now that we created camera, light and a 3D object, we should be able
to draw a simple scene. There are, however some additional steps
to be taken. The :draw message to camera requires
not an individual
thing but a list of things as a parameter.
We should create such a list even though it will only contain just one
thing.
Generally, a list of things should contain things, and it also may
contain keyword-value pairs (e.g. :LIGHTS followed by a
list
of lights) that can be used to specify properties of all things that
follow
the pair. Including the keyword-value pairs into
thing-lists
is
a convenience built into Skandha4. Alternatively, such properties
should be set for each thing individually.
Now we can draw the sphere by executing the following commands (Note that
the Skandha4 window should be visible at this point, since the window will
be redrawn only once):
The :draw message performs the calculations necessary
to render the scene, but it does not actually put it on the screen in front
of you. This is done by the other three commands, which we do not
need not discuss at this time.
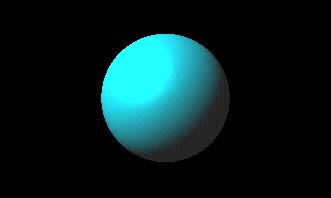
Let's modify the sphere by creating a material for it (an instance of CLASS-MATERIAL):
and appending it to the sphere:
Update the thing-list:
And redraw (the same four commands as above) :
We see that the color of the sphere has changed. The main color
characteristic of an object is determined by its diffuse color. Specular
color controls the color of highlights. Shininess controls the appearance
and the size of highlights. Again, we will not talk about these
here, but there is a number of resources on the internet that discuss and
well illustrate these issues (e.g. 3-D
Animation Workshop).
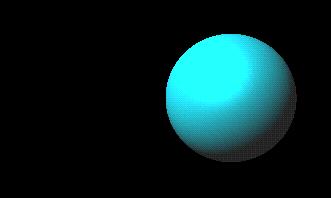
We would like to position the sphere in a different point in space.
This is done by creating a 4x4 transform matrix for the sphere:
The first expression creates a new identity transform matrix (an instance
of CLASS-MATRIX44). The second expression modifies it so that the
sphere moves to location (1 0 0). We could have achieved the same
effect if we explicitly assigned the initial contents to the transform
matrix as follows:
We now append the transform matrix to the sphere:
Update the thing-list:
And redraw the scene:
Transform specified by 4x4 matrix can be used to control the 3D object's
position, rotation, scaling along any axis and shear. Again, to find
out how 4x4 matrices work, you should refer to the literature, or the internet
sources (e.g.
Zed3D, you should make a note that the matrices in this and some other
sources are transposed compared to Skandha4 matrix notation).
The skandha4 scene you have been building continues a bit further with
lesson 2 where you'll animate the sphere. So, don't end your skandha4 interpreted session just yet.
Light, Camera, ... Object
(setq camera (send class-camera :new
    :location '(0 0 -5)
    :target '(0 0 0)
    :up '(0 1 0)
    :diameter 5
))
#<Gobject: #100cb820>
 We created a new
instance of CLASS-CAMERA by sending a
message
:new
to
this class (all manipulations and communications with objects and classes
should be performed by sending them messages). We set the the camera's
location in space, direction and orientation by attaching the appropriate
keywords
:location,
:target
and
:up
to this message, and specifying
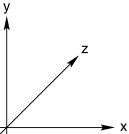
these parameters as vectors in 3D space. Note that x axis
on your screen points to the right, y axis points up and z
axis points away from you, forming a left hand coordinate system.
We created a new
instance of CLASS-CAMERA by sending a
message
:new
to
this class (all manipulations and communications with objects and classes
should be performed by sending them messages). We set the the camera's
location in space, direction and orientation by attaching the appropriate
keywords
:location,
:target
and
:up
to this message, and specifying
these parameters as vectors in 3D space. Note that x axis
on your screen points to the right, y axis points up and z
axis points away from you, forming a left hand coordinate system.
(setq light (send class-light :new
    :target '(1 -1 1)
    :is-local nil
    :ambient-color '(0.5 0.5 0.5)
    :color '(1 1 1)
))
#<Gobject: #100cae30>
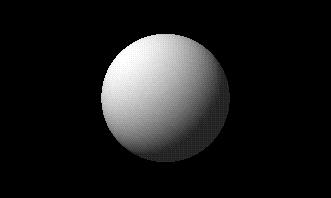
(setq sphere (xg.3d-make-thing-of-rectangles :want-point-normals t))
(:USE-NORMALS T :USE-COLORS T :FACET-RELATION #<Gobject: #100c1730> :POINT-RELATION #<Gobject: #100c1f50>)
(XG.3D-INSERT-BALL :THING sphere :U-POINTS 50 :V-POINTS 50)
NIL
 We created an approximation
of a sphere composed of many small rectangles (similar to that on the left).
The values that we provided as :U-POINTS and :V-POINTS
control how many points along the meridian and the equator were used to
build this approximation.
We created an approximation
of a sphere composed of many small rectangles (similar to that on the left).
The values that we provided as :U-POINTS and :V-POINTS
control how many points along the meridian and the equator were used to
build this approximation.
(setq thing-list (list :LIGHTS (list light) sphere))
(send camera :clear-zbuffer)
(send camera :clear-viewport)
(send camera :draw :THINGS thing-list)
(send camera :swap-buffers)
Material
(setq material (send class-material :new
    :DRAW-AS :SOLID
    :SPECULAR-COLOR '(0.0 0.95 1.0)
    :SHININESS      0.2
    :DIFFUSE-COLOR  '(0.0 0.9 1.0)
))
(setq sphere (append sphere (list :MATERIAL material)))
(setq thing-list (list :LIGHTS (list light) sphere))
(send camera :clear-zbuffer)
(send camera :clear-viewport)
(send camera :draw :THINGS thing-list)
(send camera :swap-buffers)
Position
(setq matrix (send class-matrix44 :new))
(send matrix :move 1 0 0)
(setq matrix (send class-matrix44 :new
 :initial-contents
 '((1 0 0 0)
   (0 1 0 0)
   (0 0 1 0)
   (1 0 0 1))
))
(setq sphere (append sphere (list :TRANSFORM matrix)))
(setq thing-list (list :LIGHTS (list light) sphere))
(send camera :clear-zbuffer)
(send camera :clear-viewport)
(send camera :draw :THINGS thing-list)
(send camera :swap-buffers)
![]()
![]()
![]()