Skandha lore
This file is an attempt to capture the rules of thumb that people have
developed when using skandha3 and skandha4 to create 3-D models and
visualizations, before this information is completely lost. Please add
to this file as you wish. Someday we might take these snippets and
make a more coherent document. Please add other topics!
General approach to creating a reconstruction
Currently,
there are two basic programs to use, both of which run on the sgi:
skandha3 and skandha4. See
Jeff's parting software overview
for an overview of these programs. Manuals for skandha3 are also in
/usr/local/data1/manuals. Currently they are in Frame format.
The current approach is to use the morpho module in skandha4 to digitize contours, then input these to skandha3 for surface tiling and optionally animations. The tiled files are saved in skandha3 native format, or they can be saved in other formats by attaching an editor to the top of the display tree. Once the skandha3 files have been created they can be read into skandha3 or skandha4. For skandha4 use the xskandha3 module, which is also the module that contains morpho.
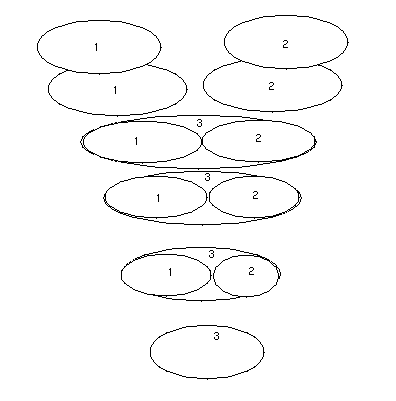 Morpho works by creating individual tubes. However, many structures have parts that appear as two separate contours on a single image. The approach taken here to that problem is to create three separate tubes (tube 1,2,3 in the figure) one for the part that only has a single contour on the images (tube 3), and one each for the part that has more than one contour (tubes 1 and 2). There is currently no way to join tubes together to create a single clean mesh for the entire structure. Instead, the authors extend the two smaller tubes into the larger tube by replicating parts of the larger contour (tube 3) and including those parts in tubes 1 and 2, down to about three levels. The cut is in inside the tubes so is not visible. Then all three tubes are tiled separately, and the normals are determined. The reason three extra tubes are added is to make sure the normals are all in the same direction for the three tubes. That way, when they are displayed together they appear to be a single smooth surface.
It should be possible to build a tube joiner that lets an author join tubes to create a single mesh.
Here is an explanation from an email message by Jeff Prothero on 8/15/96:
We keep having people do PhD theses on this, but they
never give us the code :).  We don't have anything
pretty, but when joining three tubes to make a Y


                 \A0      /B0
                  \A1    /B1
                   \A2  /B2
		     |C0
		     |C1
		     |C2
		     |C3

you can make it look smooth by copying C0 and C1
onto the ends of the A and B tubes.  (We just
use the "Save Binary File" to write out the
relevant ribbon as file "x" or such, and then
use "Load File" to load it into the next tube.
Remember to use "Normalize" on the tube menu
after doing anything like this.)  You then
usually make the copies of C1 invisible
(using the "Style = DEFAULT" menu on the ribbon)
and probably edit the copies of C0 a bit to
provide a more esthetic join.

Yes, this is a -horrible- kludge.  But it works,
and a really nice solution is more work than I've
wanted to do, by the time you work out all the
practical details (as opposed to just enough of a
proof-of-principle to get a PhD thesis
accepted...)

This is going to be very tedious on something
with a lot of branches like neurons, I'm
afraid, but it is the best we can offer at
the moment :(
Last modified: Fri Jan 31 09:42:38 PST 2003 by Kevin Hinshaw (khinshaw@u.washington.edu)